Quickstart
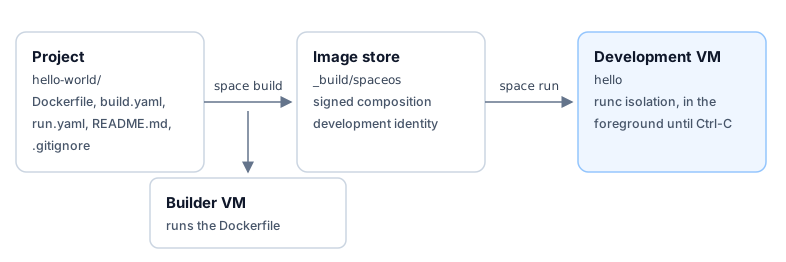
Build one Linux service into a signed SpaceOS composition and boot it in a local VM. You do not need an account. The three commands take under a minute if the builder VM is already running, and a few minutes if it is not.
Prerequisites
- A macOS host on Apple silicon, with Homebrew. The
development VM boots through Apple’s Virtualization.framework, so
space runneeds that host. Other targets are listed in the target reference. - The
spaceCLI from the Parsimoni tap. Runbrew tap parsimoni-labs/space, thenbrew install space.space --versionprints the build you have.
Step 1: Scaffold a project
$ space init hello-worldcreated hello-world (5 files)
Next:  cd hello-world  space build  space run$ cd hello-world
space init creates a new hello-world/ project with five files:
| File | Purpose |
|---|---|
Dockerfile | Defines the hello Linux service. |
build.yaml | Composes that service into a SpaceOS system image. |
run.yaml | Sets its local VM placement. |
README.md | Keeps the next commands beside the project. |
.gitignore | Keeps the build tree out of your first commit. |
The scaffolded relay authenticates every frame and rejects replayed ones, and it draws a fresh association key for each run, so you never type a key. The association authenticates frames but does not encrypt them. There is no unauthenticated posture to select.
Step 2: Build
From the new directory:
space buildspace build finds build.yaml and builds the Dockerfile service in the
builder VM. It pulls the SpaceOS runtime image from a registry or takes it from
the local OCI cache. It assembles that service and that image into the
composition under _build/spaceos and signs it. On the first build the CLI
creates a local development signing identity and prints its fingerprint. The
signed result stays in the local image store until you push it with
space image push.
It prints each stage with its elapsed time. The final block names the image, its digest, the output directory, and the identity that signed it. Every build also appends a provenance row to the host build record, a failed one included.
The build.yaml reference is the field list for the
composition, and the run.yaml reference for the
placement.
Step 3: Run
space runspace run boots the composition in the local development VM. The hello
service runs under runc isolation inside that VM. The command stays in the
foreground; press Ctrl+C to stop it. Pass
--runtime run.yaml to apply the placement in that file, --timeout SECONDS
for a bounded run, and --headless to run without the interactive display.
space run --name NAME instead registers a supervised instance on the local
runner. Watch that one with space status and space logs.
What to read next
- Port a Linux app replaces the starter service with your own.
- Troubleshooting covers the refusals a first build meets.
- The overview names what each command does.
- Platform architecture explains the build and boot path the two gated steps follow.
- The CLI reference lists every command, option, and exit status.